Valint is the main Scribe tool for creating, managing, signing, and verifying evidence. In a previous post, we covered the theory of using signing and verifying evidence as a main tool in validating the security of your CI/CD pipeline. As a short reminder, Scribe’s proposed model includes several building blocks that can be shuffled and stacked in any way that suits your needs. The building blocks include the evidence collected (SBOMs, SLSA provenance, any 3rd party test results you wish to include), The environmental context of the evidence collected (who created it, where, when, etc.), and the policy you wish to apply to that evidence.
As the policies you wish to apply to your evidence are a key factor in this model we thought we’d dedicate a blog post to explore the potential of the policy engine we offer in more detail.
In this article, we’ll go over the most basic policy we devised (sign and verify information). We’ll cover what the template for a more complex policy looks like and give a few standard examples for policies like how to verify that a specific user was the one that created the last ‘main’ branch, or how to verify that your pipeline run includes a 3rd party tool test that must be included.
Start Here: Signing And Verifying Evidence
Valint is a very versatile tool but to keep this article simple we’ll use mainly Valint’s CLI interface as an example.
The first step would be to download Valint:
curl -sSfL https://get.scribesecurity.com/install.sh | sh -s -- -t valint
The command to create an SBOM from a repository or an image is ‘bom’. So, for example, if you want to bom the image of busybox:latest the command will look like this:
$HOME/.scribe/bin/valint bom busybox:latest -o attest -f
Note that attest is an alias for attest-cyclonedx-json.
By default, Valint is using Sigstore interactive flow as the engine behind the signing mechanism embedded in Scribe’s Cocosign library. This library deals with digital signatures for signing and verification. Once you apply the command you’ll need to first approve that you wish to sign the evidence with a Y/[N] option:

You can also use standard PKI for signing (we support x509 certificates). There are multiple options for storing the signing key – e.g. KMS, GitHub secret store, and you can easily configure Valint to use whichever signing mechanism you wish.
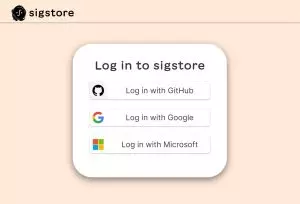
Assuming you approve the signature, you’ll be directed to Sigstore in your browser where you’ll need to log in using either your GitHub account, your Google account, or your Microsoft account:
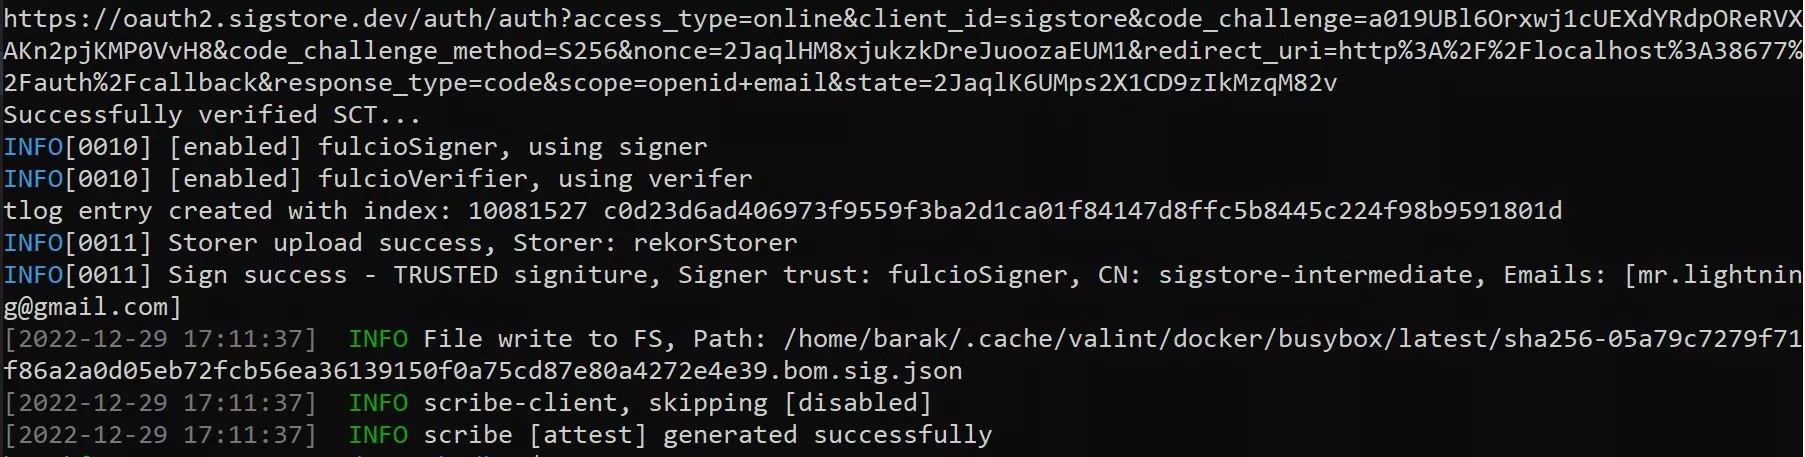
Once you have signed in you’ll see that the login was successful:

at which point you can close the browser and head back to your shell where you can see that the evidence was created successfully.
The attestation is written by default to the local cache whose location is provided by the --output-directory flag in the configuration file flag. You can also use the –output-file flag to provide a custom path for the attestation.
Now that we have created a signed attestation, let’s attempt to verify it exists and is signed. The command to verify evidence is verify. The way to use it is almost identical to the bom command except we’ll be using the flag -iwhich is short for --input-format and the default for it is, like in bom, attest-cyclonedx-json. The verify command will first look for the evidence it needs in the default location used by Valint. You can specify a different location if you want both for saving the evidence and to look for it later.
So, if we want to verify the busybox:latest image attestation we have generated and signed in the previous example the command will look like this:
$HOME/.scribe/bin/valint verify busybox:latest -i attest
Assuming you did everything right the result should look like this:
You can see the list of emails that includes the signer email on the original attestation and you can also see the type of the attestation that was verified, in this case, cyclonedx-json.
Seems pretty straightforward right? Let’s kick it up a notch.
Policy Templates
A policy consists of a set of modules. The policy is verified if all of the modules it includes are evaluated and verified. A module is verified if ANY evidence is found that complies with the module configuration and setting.
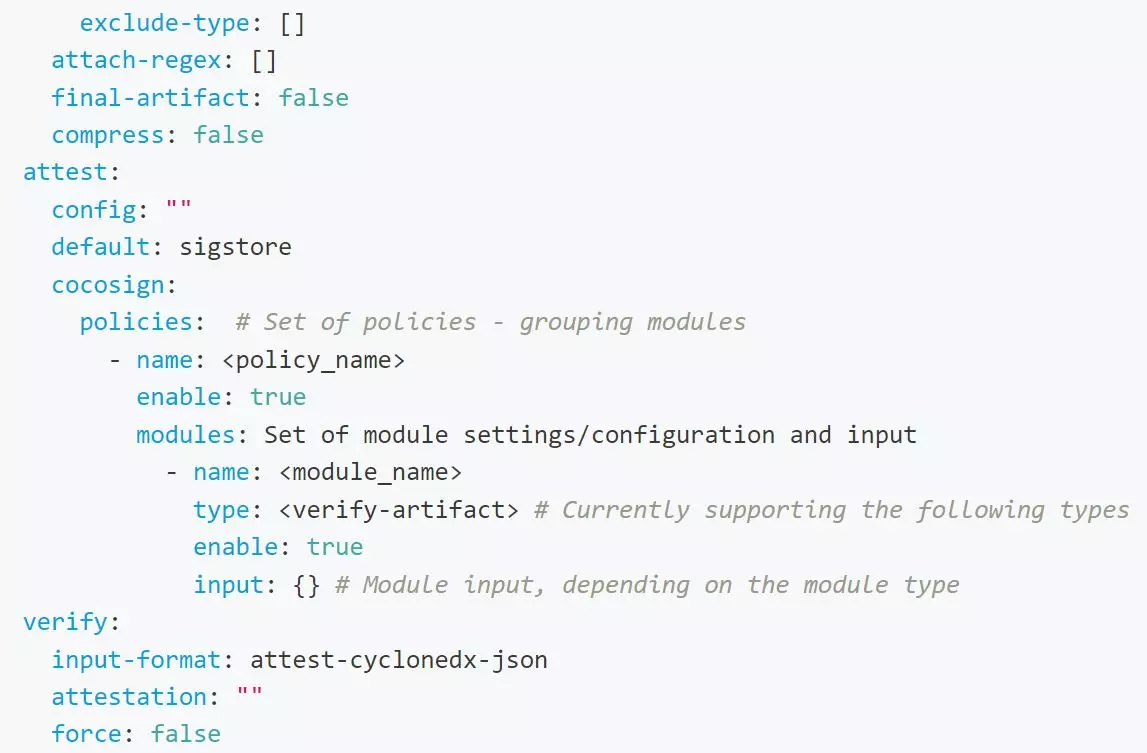
Policies are configured as part of Valint’s configuration file, under the policies section. This is an example of part of a Valint configuration file, the part containing potential policies.
Remember that you don’t have to include a configuration file in your project – Valint can work just fine with only the default options enabled. Additionally, since everything in this file is optional, it’s perfectly valid to have such a file that includes ONLY your policies.
The configuration file, named by default .valint.yaml, should be included at the root of your repository. Based on whatever policies you include in this file, when you run the command valint verify it will run whatever policies and modules are enabled. Because the basic ‘verify’ policy is the default, you don’t have to configure anything for the verify command to work properly even without a .valint.yaml file.
Whatever policy you add to the configuration file is dependent on having evidence to look for. By default, when you run the ‘bom’ command in your pipeline the resulting evidence will be uploaded to the Scribe evidence store. Similarly, when you run the ‘verify’ command, it will look for the evidence in the Scribe evidence store. You can change this default and use an OCI or a cache as your evidence store but for this article, we’ll assume the default is used and all evidence is uploaded and pulled from the Scribe evidence store.
So, based on this example let’s look at the components of a policy. The policy supports the following fields:
- name, the policy name (required).
- enable, enable the module (the default is false).
- modules, list of policy module configurations.
The module sections support the following fields:
- name, the policy module name (required).
- enable, enable the module (the default is false).
- type, type of the module, currently supporting verify-artifact and git-owner.
- match, match on evidence with a specific context.
- input, module-specific configuration.
A policy can have multiple modules and all the enabled modules will be run once you execute the ‘verify’ command.
Since I know that a dry list of fields isn’t very informative let’s dive right into the next section, sample policies.
Sample Policies
Image Verification Policy
Let’s start with the simplest policy, one that expresses the Valint sign-verify flow.
attest:
  cocosign:
    policies:
      - name: verify_policy
        enable: true
        modules:
          - name: signed_sbom
            type: verify-artifact
            enable: true
            input:
              signed: true
              format: attest-cyclonedx-json
              identity:
                emails:
                  - barak@scribesecurity.com
Again, this policy should be included in the .valint.yaml file at the root of your repository. For it to work you’ll need to have created a signed SBOM in advance by running the valint bom command. Once you’re ready to verify it you’ll need to run the valint verify command.
Looking at this example we can see that the policy is enabled and that it has one enabled module of type ‘verify-artifact‘. The module checks that the input is signed, is of format ‘attest-cyclonedx-json’, and that it was signed by the identity represented by the email ‘barak@scribesecurity.com’.
To run this policy we’ll need to execute the verifycommand in our pipeline like this:
valint verify busybox:latest
Since the verify command is now based on the policy we provided it will look for a busybox:latest piece of evidence in your Scribe evidence store. It will look for a signed SBOM of format `cyclonedx-json` and it would check that the identity that signed the SBOM uses the email prescribed in the policy `barak@scribesecurity.com`.
You might say that there could be multiple images like that in that evidence store and you’d be right. This is where the context comes into play. By default, verify command will look for the closest match available. You can, however, specify that the command will need to match the context of the pipeline run ID or the build system the artifact was created in. To do that you’ll need to use the field match: with the appropriate context type. For example:
            match:
               context_type: github
               git_url: github.com/my_org/myimage.git
               branch: main
In this case, the evidence had to have been generated by Github, by the repository named by the git_url and by the main branch of that repository. It’s important to use the right context where needed to make sure your policies verify exactly what you want them to verify.
Binary Verification Policy
Let’s examine another example. This policy is meant to verify that an exe file we’re checking came from a specific repository and was signed by one of several known individuals.
attest:
  cocosign:
    policies:
      - name: verify_policy
        enable: true
        modules:
          - name: binary_module
            type: verify-artifact
            enable: true
            input:
              signed: true
              format: attest-cyclonedx-json
              identity:
                emails:
                  - barak@scribesecurity.com
                  - mikey@scribesecurity.com
                  - adam@scribesecurity.com
              match:
                target_type: file
                context_type: azure
                git_url: https://dev.azure.com/mycompany/somerepo # Git url of the environment.
                input_name: my_binary.exe
Looking at this example we can see that the policy is enabled and that it has one enabled module of type ‘verify-artifact‘ The module checks that the input is signed, that it is in format ‘attest-cyclonedx-json’, and that it was signed by 1 of 3 permitted emails listed in the module. Additionally, it checks that the verify command receives an input to verify, that the input is named ‘my_binary.exe’, that the input is a file that was created in Azure, and that it came from a specific git URL: https://dev.azure.com/mycompany/somerepo.
As you can see there are a lot more requirements in this example for the policy to be verified.
To run this policy we’ll need to execute the verify command in our pipeline like this:
valint verify file:my_binary.exe
To make sure your Scribe evidence store has a signed version of this binary, you should first create the evidence like this:
valint bom file:my_binary.exe -o attest
3rd party evidence verification Policy
In our final example let’s see how we can verify that a 3rd party tool we use has run properly in our pipeline and has created the result we expect in the form of a JSON file.
attest:
  cocosign:
    policies:
      - name: verify_policy
        enable: true
        modules:
          - name: 3rd-party-rule
            type: verify-artifact
            enable: true
            input:
              signed: false
              format: attest-generic
              identity:
                emails:
                - bob@scribesecurity.com
              match:
                target_type: generic
                context_type: azure
                git_url: https://dev.azure.com/mycompany/somerepo
                git_branch: main
                input_name: 3rd-party-scan.json
In this example, we imagine that at some point in the pipeline, we have run a 3rd party tool that created, as a result, the `3rd-party-scan.json` file. To satisfy the policy that file should have originated from Azure DevOps, triggered by the `https://dev.azure.com/mycompany/somerepo` repository and signed by `bob@scribesecurity.com`.
To generate the evidence we’re looking for, right after the 3rd party tool was run we need to capture the resulting file and turn it into evidence using Valint:
valint bom 3rd-party-scan.json -o attest-generic --predicate-type https://scanner.com/scan_format
What Does The Evidence Prove?
So we’ve seen we can use Valine to verify various things in our pipeline. What can this ability really be used for?
Let’s imagine that our pipeline has been breached and that some bad guys have started to do things in it and to it that we don’t want them to do. By verifying that different steps of the pipeline took place as expected, producing the expected results, and signed by the approved personnel we make it that much harder for the bad guys to deceive us.
One potential attack is to replace the binary file at the end of the pipeline so that the version your clients get is a malicious one rather than your original. By signing your version and asking your clients to verify against that master copy you can make sure that they all use the same file you produced and not a clever counterfeit.
This model of creating evidence and then verifying it is only getting started. We’re constantly working to add additional capabilities to Valint to make it even more robust and versatile. In the meantime, I encourage you to check out our documentation to learn more about what Scribe has to offer and what more you can do with Valint. Valint is free to download and use so there really shouldn’t be anything stopping you from giving this tool a try today.
This content is brought to you by Scribe Security, a leading end-to-end software supply chain security solution provider – delivering state-of-the-art security to code artifacts and code development and delivery processes throughout the software supply chains. Learn more.
Related posts